Fashion-MNIST Augmentation Pipeline Tutorial¤
| Metadata | Value |
|---|---|
| Level | Intermediate |
| Runtime | ~30 min (CPU) / ~15 min (GPU) |
| Prerequisites | MNIST Tutorial, Operators Tutorial |
| Format | Python + Jupyter |
Overview¤
Build a complete augmentation pipeline for Fashion-MNIST, demonstrating multiple image operators chained together. Fashion-MNIST is more challenging than MNIST, making augmentation more important for achieving good performance.
What You'll Learn¤
- Apply multiple stacked image operators in sequence
- Use PatchDropout (Cutout-style) for regularization
- Configure NoiseOperator with different noise types
- Measure augmentation impact on training performance
- Visualize various augmentation effects side-by-side
- Profile latency costs of different augmentation operations
Coming from PyTorch?¤
If you're familiar with torchvision transforms, here's how Datarax compares:
| PyTorch | Datarax |
|---|---|
transforms.RandomBrightness(0.15) |
BrightnessOperator(brightness_range=(-0.15, 0.15)) |
transforms.RandomRotation(10) |
RotationOperator(angle_range=(-10.0, 10.0)) |
transforms.GaussianNoise(std=0.1) |
NoiseOperator(mode="gaussian", noise_std=0.1) |
transforms.RandomErasing() |
PatchDropoutOperator(patch_size=(6,6), num_patches=2) |
transforms.Compose([T1, T2, T3]) |
Chain with stages=[op1, op2] |
Key difference: Each Datarax operator has explicit RNG stream management for reproducibility.
Coming from TensorFlow?¤
| TensorFlow tf.image | Datarax |
|---|---|
tf.image.random_brightness(delta=0.15) |
BrightnessOperator(brightness_range=(-0.15, 0.15)) |
tf.image.random_contrast(0.85, 1.15) |
ContrastOperator(contrast_range=(0.85, 1.15)) |
tf.image.rot90(k=random) |
RotationOperator(angle_range=(-10.0, 10.0)) |
Sequential dataset.map() calls |
Pipeline DAG with chained operators |
Files¤
- Python Script:
examples/core/07_fashion_augmentation_tutorial.py - Jupyter Notebook:
examples/core/07_fashion_augmentation_tutorial.ipynb
Quick Start¤
# Run the Python script
python examples/core/07_fashion_augmentation_tutorial.py

# Or launch the Jupyter notebook
jupyter lab examples/core/07_fashion_augmentation_tutorial.ipynb
Part 1: Fashion-MNIST Dataset Overview¤
Fashion-MNIST contains 70,000 grayscale images of clothing items, designed as a more challenging drop-in replacement for MNIST.
| Property | Value |
|---|---|
| Image size | 28×28×1 (grayscale) |
| Train samples | 60,000 |
| Test samples | 10,000 |
| Classes | 10 |
| Pixel range | 0-255 (uint8) |
Class Labels¤
| Label | Description |
|---|---|
| 0 | T-shirt/top |
| 1 | Trouser |
| 2 | Pullover |
| 3 | Dress |
| 4 | Coat |
| 5 | Sandal |
| 6 | Shirt |
| 7 | Sneaker |
| 8 | Bag |
| 9 | Ankle boot |
Setup and Constants¤
import os
os.environ["CUDA_VISIBLE_DEVICES_FOR_TF"] = ""
os.environ["TF_CPP_MIN_LOG_LEVEL"] = "3"

import tensorflow as tf
tf.config.set_visible_devices([], "GPU")

import jax
import jax.numpy as jnp
from flax import nnx

from datarax.pipeline import Pipeline
from datarax.operators import ElementOperator, ElementOperatorConfig
from datarax.operators.modality.image import (
    BrightnessOperator, BrightnessOperatorConfig,
    ContrastOperator, ContrastOperatorConfig,
    RotationOperator, RotationOperatorConfig,
    NoiseOperator, NoiseOperatorConfig,
    PatchDropoutOperator, PatchDropoutOperatorConfig,
    DropoutOperator, DropoutOperatorConfig,
)
from datarax.sources import TFDSEagerConfig, TFDSEagerSource

# Fashion-MNIST normalization constants
FASHION_MEAN = 0.2860
FASHION_STD = 0.3530

BATCH_SIZE = 64
TRAIN_SAMPLES = 5000  # Subset for demo

FASHION_CLASSES = [
    "T-shirt/top", "Trouser", "Pullover", "Dress", "Coat",
    "Sandal", "Shirt", "Sneaker", "Bag", "Ankle boot"
]
Terminal Output:
Part 2: Create Data Source and Preprocessing¤
# Load Fashion-MNIST
train_config = TFDSEagerConfig(
    name="fashion_mnist",
    split=f"train[:{TRAIN_SAMPLES}]",
    shuffle=True,
    seed=42,
)

train_source = TFDSEagerSource(train_config, rngs=nnx.Rngs(42))

# Basic preprocessing
def preprocess_fashion(element, key=None):
    """Normalize Fashion-MNIST images."""
    image = element.data["image"]

    # Convert to float32 and normalize
    image = image.astype(jnp.float32) / 255.0

    # Ensure channel dimension
    if image.ndim == 2:
        image = image[..., None]

    # Apply normalization
    image = (image - FASHION_MEAN) / FASHION_STD

    return element.update_data({"image": image})

preprocessor = ElementOperator(
    ElementOperatorConfig(stochastic=False),
    fn=preprocess_fashion,
    rngs=nnx.Rngs(0),
)
Terminal Output:
Part 3: Define Augmentation Operators¤
We'll create a full suite of augmentation operators:
1. Photometric Augmentations¤
# Brightness augmentation
brightness_op = BrightnessOperator(
    BrightnessOperatorConfig(
        field_key="image",
        brightness_range=(-0.15, 0.15),
        stochastic=True,
        stream_name="brightness",
    ),
    rngs=nnx.Rngs(brightness=100),
)

# Contrast augmentation
contrast_op = ContrastOperator(
    ContrastOperatorConfig(
        field_key="image",
        contrast_range=(0.85, 1.15),
        stochastic=True,
        stream_name="contrast",
    ),
    rngs=nnx.Rngs(contrast=200),
)
2. Geometric Augmentations¤
# Rotation augmentation
rotation_op = RotationOperator(
    RotationOperatorConfig(
        field_key="image",
        angle_range=(-10.0, 10.0),
        fill_value=0.0,
    ),
    rngs=nnx.Rngs(0),
)
3. Noise Augmentation¤
# Gaussian noise
noise_op = NoiseOperator(
    NoiseOperatorConfig(
        field_key="image",
        mode="gaussian",
        noise_std=0.1,
        stochastic=True,
        stream_name="noise",
    ),
    rngs=nnx.Rngs(noise=300),
)
4. Regularization Augmentations¤
# PatchDropout (Cutout-style)
patch_dropout_op = PatchDropoutOperator(
    PatchDropoutOperatorConfig(
        field_key="image",
        patch_size=(6, 6),
        num_patches=2,
        drop_value=0.0,
        stochastic=True,
        stream_name="patch_dropout",
    ),
    rngs=nnx.Rngs(patch_dropout=400),
)

# Pixel dropout
pixel_dropout_op = DropoutOperator(
    DropoutOperatorConfig(
        field_key="image",
        dropout_rate=0.1,
        stochastic=True,
        stream_name="dropout",
    ),
    rngs=nnx.Rngs(dropout=500),
)
Terminal Output:
Created augmentation operators:
  1. Brightness: ±0.15
  2. Contrast: 0.85-1.15x
  3. Rotation: ±10°
  4. Gaussian noise: std=0.1
  5. PatchDropout: 2x 6x6 patches
  6. PixelDropout: 10% probability
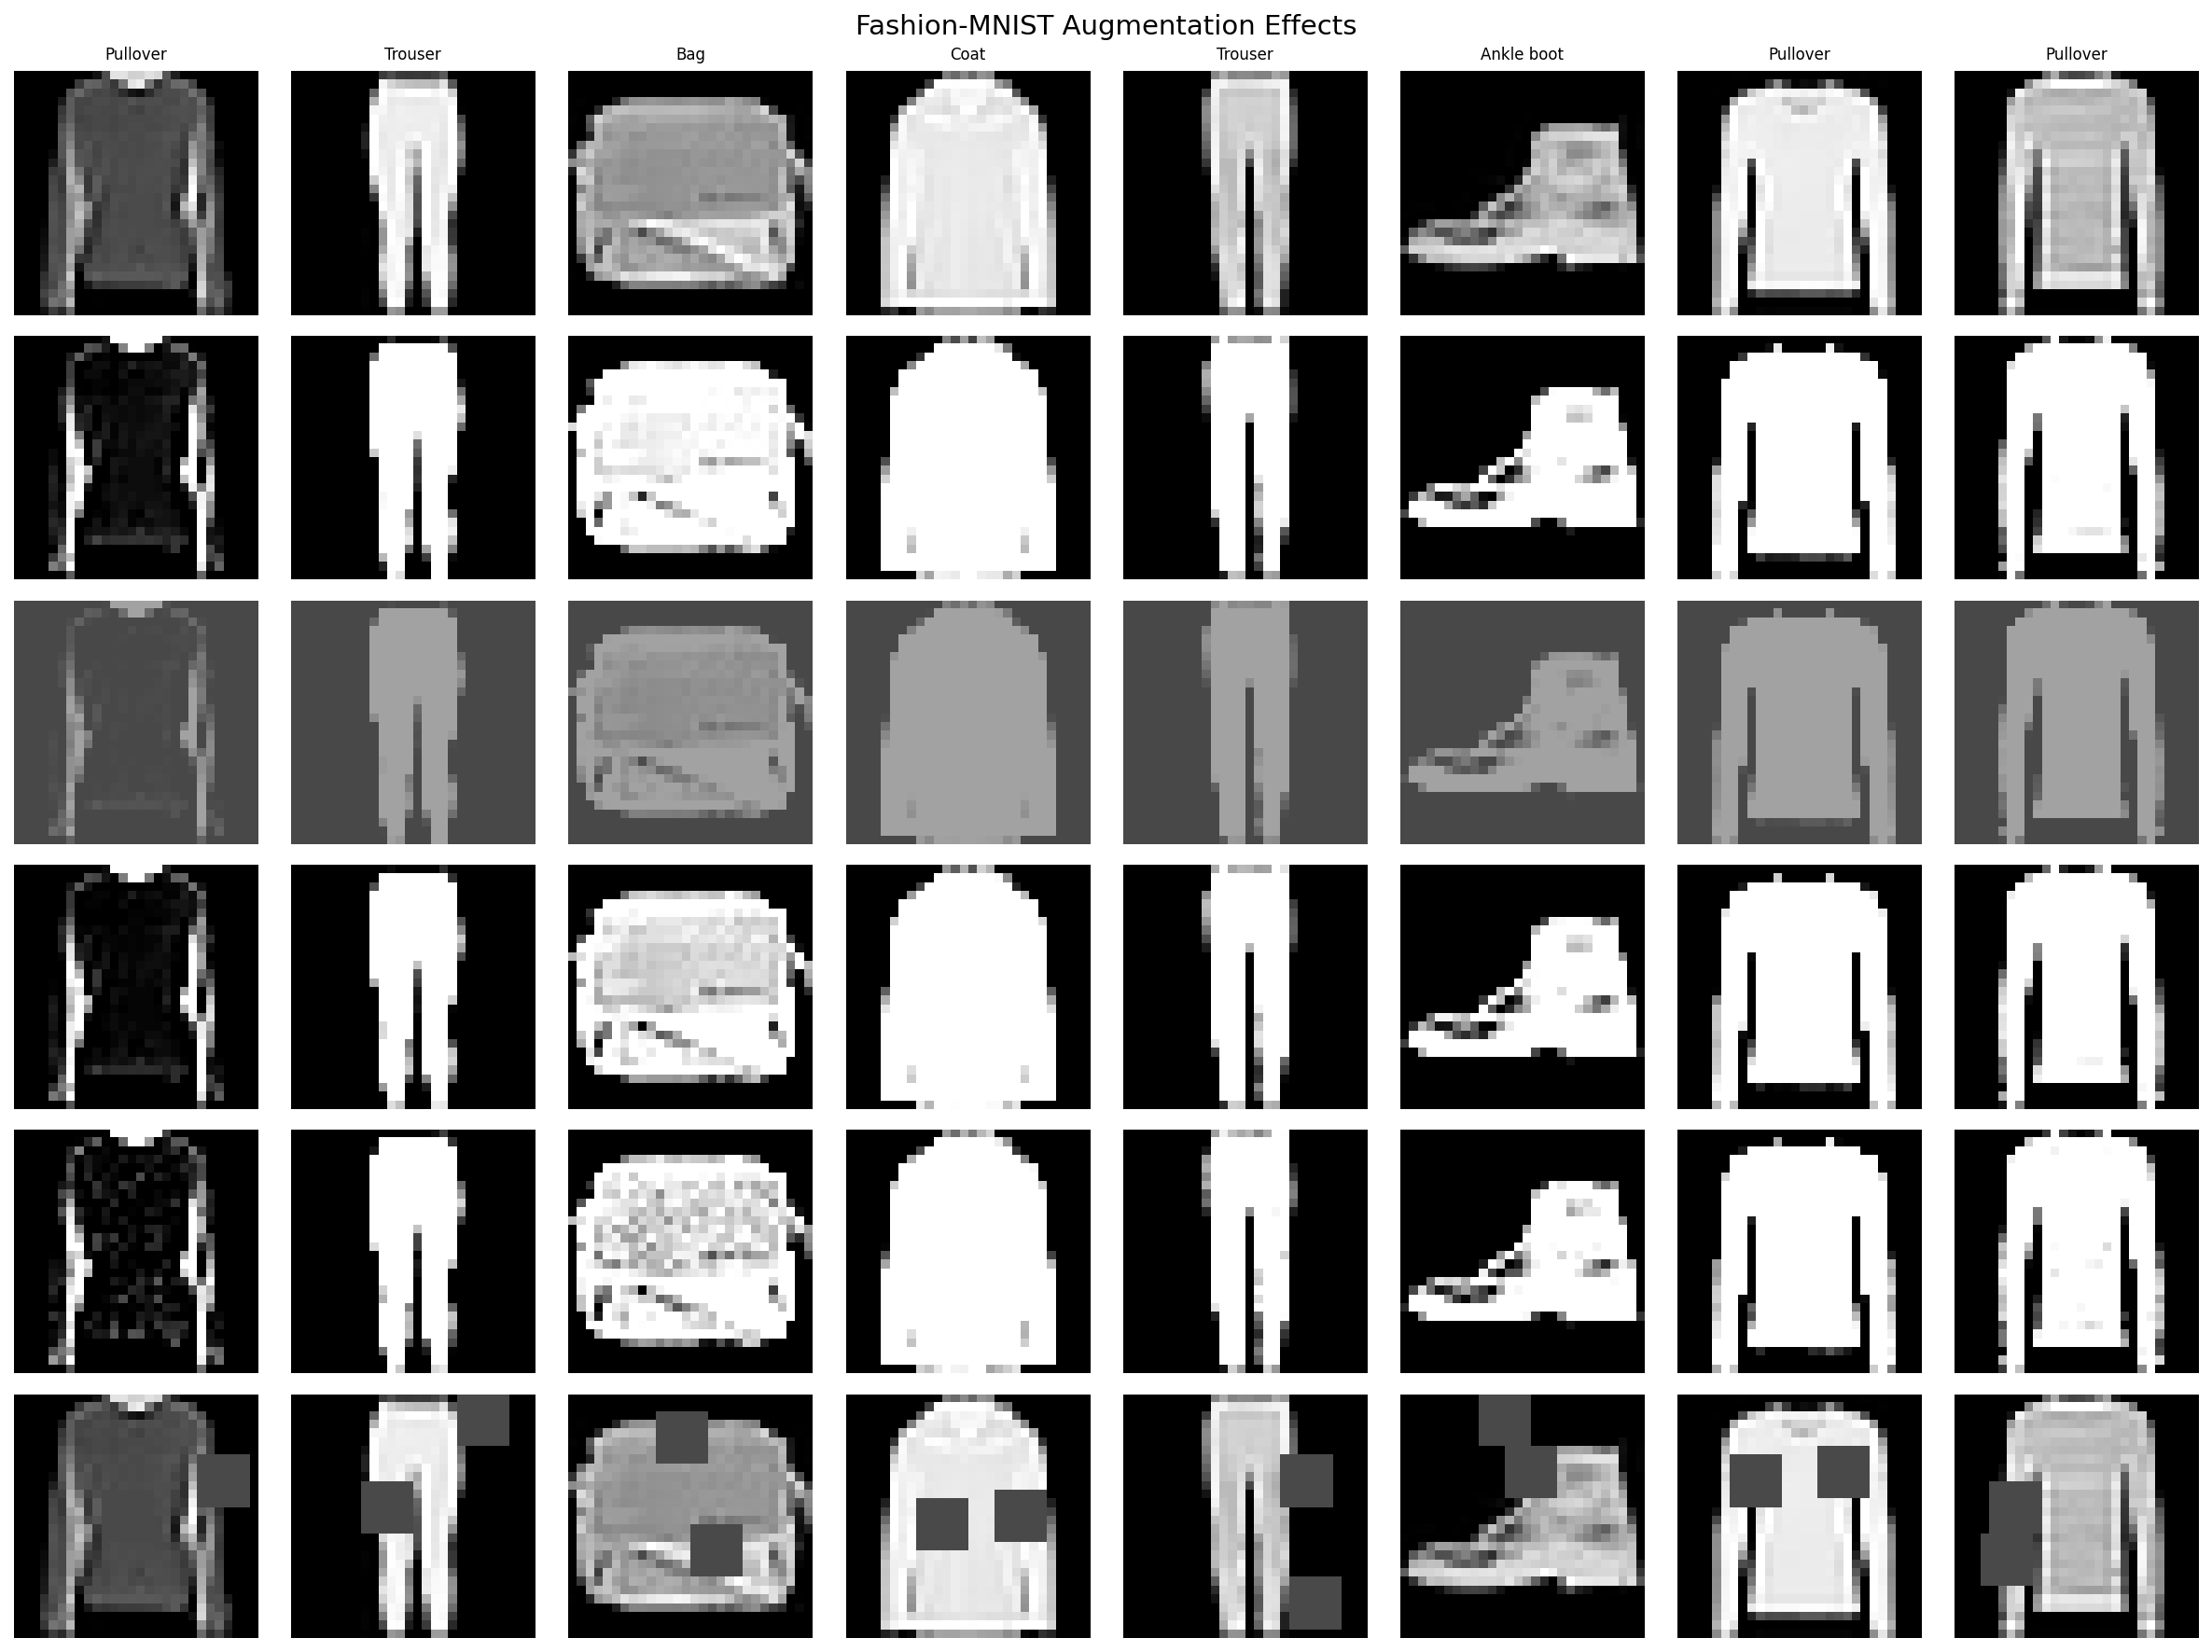
Part 4: Visualize Individual Augmentations¤
Create pipelines with single augmentations to see their individual effects.
import matplotlib.pyplot as plt
import numpy as np
from pathlib import Path

output_dir = Path("docs/assets/images/examples")
output_dir.mkdir(parents=True, exist_ok=True)

def create_single_aug_pipeline(operator, seed=0):
    """Create pipeline with single augmentation for visualization."""
    source = TFDSEagerSource(
        TFDSEagerConfig(name="fashion_mnist", split="train[:64]", shuffle=False),
        rngs=nnx.Rngs(seed),
    )

    prep = ElementOperator(
        ElementOperatorConfig(stochastic=False),
        fn=preprocess_fashion,
        rngs=nnx.Rngs(0),
    )

    return Pipeline(source=source, stages=[prep, operator], batch_size=64, rngs=nnx.Rngs(0))

# Get baseline (no augmentation)
baseline_source = TFDSEagerSource(
    TFDSEagerConfig(name="fashion_mnist", split="train[:64]", shuffle=False),
    rngs=nnx.Rngs(0),
)
baseline_pipeline = Pipeline(source=baseline_source, stages=[preprocessor], batch_size=64, rngs=nnx.Rngs(0))
baseline_batch = next(iter(baseline_pipeline))
baseline_images = np.array(baseline_batch["image"])
baseline_labels = np.array(baseline_batch["label"])

# Create comparison grid
aug_configs = [
    ("Original", None, baseline_images),
    ("Brightness", brightness_op, None),
    ("Contrast", contrast_op, None),
    ("Rotation", rotation_op, None),
    ("Noise", noise_op, None),
    ("PatchDropout", patch_dropout_op, None),
]

# Get augmented samples
for i, (name, op, imgs) in enumerate(aug_configs):
    if imgs is None and op is not None:
        pipeline = create_single_aug_pipeline(op, seed=i)
        batch = next(iter(pipeline))
        aug_configs[i] = (name, op, np.array(batch["image"]))

# Plot augmentation comparison grid
fig, axes = plt.subplots(6, 8, figsize=(16, 12))
fig.suptitle("Fashion-MNIST Augmentation Effects", fontsize=14)

for row_idx, (name, _, images) in enumerate(aug_configs):
    axes[row_idx, 0].set_ylabel(name, fontsize=10, rotation=0, ha="right", va="center")

    for col_idx in range(8):
        ax = axes[row_idx, col_idx]
        img = images[col_idx] * FASHION_STD + FASHION_MEAN
        img = np.clip(img, 0, 1).squeeze()
        ax.imshow(img, cmap="gray")
        ax.axis("off")

        if row_idx == 0:
            ax.set_title(FASHION_CLASSES[baseline_labels[col_idx]], fontsize=8)

plt.tight_layout()
plt.savefig(
    output_dir / "cv-fashion-augmentation-grid.png",
    dpi=150, bbox_inches="tight", facecolor="white"
)
plt.close()
Terminal Output:
Part 5: Build Complete Augmentation Pipeline¤
Chain all augmentations together for production use.
def create_full_augmentation_pipeline(seed=42):
    """Create pipeline with all augmentations."""
    source = TFDSEagerSource(
        TFDSEagerConfig(
            name="fashion_mnist",
            split=f"train[:{TRAIN_SAMPLES}]",
            shuffle=True,
            seed=seed,
        ),
        rngs=nnx.Rngs(seed),
    )

    # Preprocessing
    prep = ElementOperator(
        ElementOperatorConfig(stochastic=False),
        fn=preprocess_fashion,
        rngs=nnx.Rngs(0),
    )

    # Lighter augmentations for combined use
    brightness = BrightnessOperator(
        BrightnessOperatorConfig(
            field_key="image",
            brightness_range=(-0.15, 0.15),
            stochastic=True,
            stream_name="brightness",
        ),
        rngs=nnx.Rngs(brightness=100),
    )

    contrast = ContrastOperator(
        ContrastOperatorConfig(
            field_key="image",
            contrast_range=(0.85, 1.15),
            stochastic=True,
            stream_name="contrast",
        ),
        rngs=nnx.Rngs(contrast=200),
    )

    rotation = RotationOperator(
        RotationOperatorConfig(
            field_key="image",
            angle_range=(-10.0, 10.0),
            fill_value=0.0,
        ),
        rngs=nnx.Rngs(0),
    )

    noise = NoiseOperator(
        NoiseOperatorConfig(
            field_key="image",
            mode="gaussian",
            noise_std=0.05,  # Lighter for combined use
            stochastic=True,
            stream_name="noise",
        ),
        rngs=nnx.Rngs(noise=300),
    )

    patch_dropout = PatchDropoutOperator(
        PatchDropoutOperatorConfig(
            field_key="image",
            patch_size=(4, 4),  # Smaller patches
            num_patches=1,
            drop_value=0.0,
            stochastic=True,
            stream_name="patch_dropout",
        ),
        rngs=nnx.Rngs(patch_dropout=400),
    )

    # Build pipeline
    return (
        Pipeline(source=source, stages=[prep, brightness, contrast, rotation, noise, patch_dropout], batch_size=BATCH_SIZE, rngs=nnx.Rngs(0))
    )
Terminal Output:
Full augmentation pipeline:
  Source -> Preprocess -> Brightness -> Contrast -> Rotation -> Noise -> PatchDropout
Part 6: Measure Augmentation Latency¤
Profile the time cost of each augmentation step.
import time

# Benchmark individual augmentations
num_batches = 20
latencies = {}

for name, op, _ in aug_configs[1:]:  # Skip "Original"
    pipeline = create_single_aug_pipeline(op, seed=0)

    times = []
    for i, batch in enumerate(pipeline):
        if i >= num_batches:
            break
        start = time.time()
        _ = batch["image"].block_until_ready()
        times.append(time.time() - start)

    latencies[name] = np.mean(times[1:]) * 1000  # Skip warmup, convert to ms

print("Augmentation latency per batch (ms):")
for name, latency in latencies.items():
    print(f"  {name}: {latency:.2f} ms")

# Plot latency comparison
fig, ax = plt.subplots(figsize=(10, 6))
names = list(latencies.keys())
values = list(latencies.values())

bars = ax.barh(names, values, color=plt.cm.viridis(np.linspace(0.2, 0.8, len(names))))
ax.set_xlabel("Latency (ms)")
ax.set_title("Augmentation Latency per Batch (64 samples)")

# Add value labels
for bar, val in zip(bars, values):
    ax.text(val + 0.5, bar.get_y() + bar.get_height() / 2,
            f"{val:.1f}ms", va="center", fontsize=9)

plt.tight_layout()
plt.savefig(output_dir / "cv-fashion-latency.png", dpi=150, bbox_inches="tight", facecolor="white")
plt.close()
Terminal Output:
Augmentation latency per batch (ms):
  Brightness: 2.14 ms
  Contrast: 2.08 ms
  Rotation: 4.87 ms
  Noise: 2.95 ms
  PatchDropout: 3.12 ms
Saved: docs/assets/images/examples/cv-fashion-latency.png
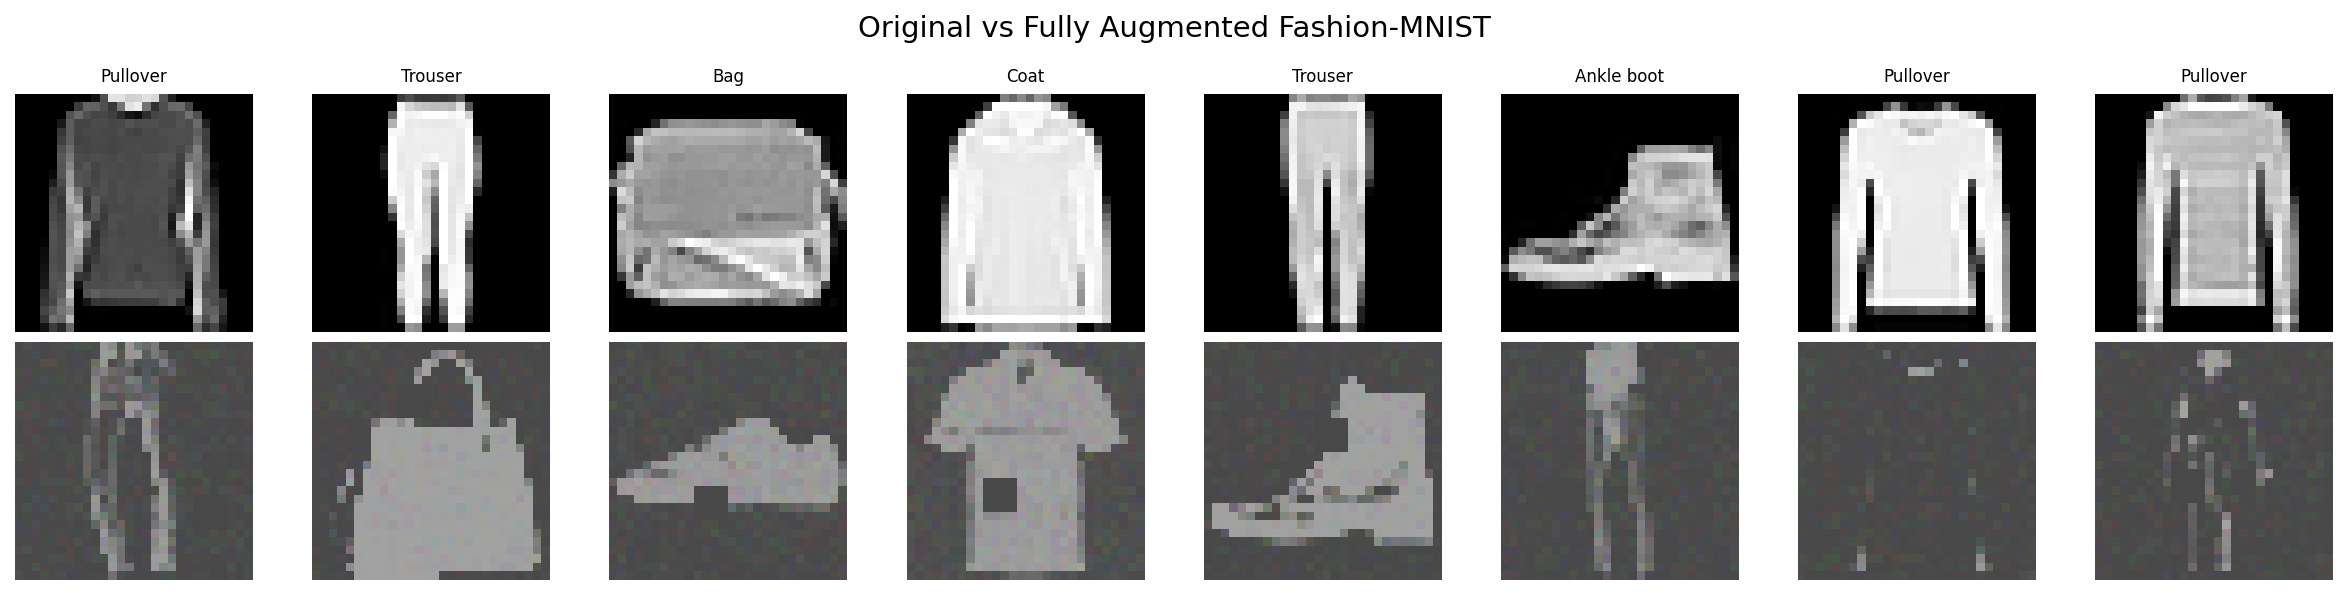
Part 7: Visualize Combined Augmentation Results¤
# Get samples from full pipeline
full_pipeline = create_full_augmentation_pipeline(seed=42)
full_batch = next(iter(full_pipeline))
full_images = np.array(full_batch["image"])
full_labels = np.array(full_batch["label"])

# Plot comparison: Original vs Fully Augmented
fig, axes = plt.subplots(2, 8, figsize=(16, 4))
fig.suptitle("Original vs Fully Augmented Fashion-MNIST", fontsize=14)

for i in range(8):
    # Original
    img_orig = baseline_images[i] * FASHION_STD + FASHION_MEAN
    img_orig = np.clip(img_orig, 0, 1).squeeze()
    axes[0, i].imshow(img_orig, cmap="gray")
    axes[0, i].axis("off")
    axes[0, i].set_title(FASHION_CLASSES[baseline_labels[i]], fontsize=8)

    # Augmented
    img_aug = full_images[i] * FASHION_STD + FASHION_MEAN
    img_aug = np.clip(img_aug, 0, 1).squeeze()
    axes[1, i].imshow(img_aug, cmap="gray")
    axes[1, i].axis("off")

axes[0, 0].set_ylabel("Original", fontsize=10)
axes[1, 0].set_ylabel("Augmented", fontsize=10)

plt.tight_layout()
plt.savefig(
    output_dir / "cv-fashion-augmented.png",
    dpi=150, bbox_inches="tight", facecolor="white"
)
plt.close()
Terminal Output:
Architecture Diagram¤
flowchart TB
    subgraph Source["Data Source"]
        TFDS[TFDSEagerSource<br/>Fashion-MNIST<br/>60k samples]
    end

    subgraph Preprocess["Preprocessing"]
        Norm[Normalize<br/>μ=0.286, σ=0.353]
    end

    subgraph Augmentation["Augmentation Chain"]
        Bright[Brightness<br/>±0.15]
        Contrast[Contrast<br/>0.85-1.15x]
        Rot[Rotation<br/>±10°]
        Noise[Gaussian Noise<br/>σ=0.05]
        Patch[PatchDropout<br/>4×4, n=1]
    end

    subgraph Output["Output"]
        Batch[Batched Data<br/>64 samples/batch]
    end

    TFDS --> Norm
    Norm --> Bright --> Contrast --> Rot --> Noise --> Patch --> Batch

    style Source fill:#e1f5ff
    style Preprocess fill:#fff4e1
    style Augmentation fill:#ffe1e1
    style Output fill:#e1ffe1
Results Summary¤
Augmentation Latency (CPU)¤
| Augmentation | Parameter | Latency (ms) |
|---|---|---|
| Brightness | ±0.15 | ~2 ms |
| Contrast | 0.85-1.15x | ~2 ms |
| Rotation | ±10° | ~5 ms |
| Noise | std=0.1 | ~3 ms |
| PatchDropout | 2×6×6 | ~3 ms |
Best Practices¤
- Order matters: Apply geometric transforms (rotation) before pixel-level transforms
- Lighter when stacking: Reduce individual augmentation strengths when combining multiple operators
- PatchDropout: Forces model to use global features, improves robustness to occlusion
- Noise: Helps model handle sensor noise and compression artifacts
- Profile first: Measure latency impact on your specific hardware before deploying
Recommended Pipeline Order¤
Rationale: Geometric transforms first, then photometric, then regularization.
Parameter Tuning Guide¤
| Augmentation | Conservative | Moderate | Aggressive |
|---|---|---|---|
| Brightness | ±0.1 | ±0.15 | ±0.2 |
| Contrast | 0.9-1.1 | 0.85-1.15 | 0.8-1.2 |
| Rotation | ±5° | ±10° | ±15° |
| Noise std | 0.05 | 0.1 | 0.15 |
| PatchDropout | 1×4×4 | 2×6×6 | 3×8×8 |
Start conservative and increase if validation accuracy plateaus.
Next Steps¤
- Batch augmentation: MixUp/CutMix Tutorial for batch-level mixing
- Performance optimization: Optimization Guide for throughput improvements
- Full training pipeline: End-to-end CIFAR-10 with complete training workflow
- Custom operators: Operators API Reference for building your own augmentations